5 Brilliant Gmail Hacks That Will Organize Your Life

Flickr / Go Digital
If you’re a Gmail user (and, to be honest, it would be weird if you weren’t at this point), you probably feel pretty organized already. How much simpler could the email product get? Well, you don’t know what you’re missing. These five Gmail hacks will turn your supposedly-put-together life upside down and show you what true organization looks like.
1. Utilize The Stars
You already know how to star important messages, but what you didn’t know is that the options don’t just end with that one star. You can organize your emails by multiple colors of stars.
Here’s how: Go to your settings by clicking on the gear. Under “General,” scroll down until you see Stars, then you can drag the star options from the bottom line to the top line. Also, you’ll see that icons like an exclamation point and question mark can be used on different emails to signal varying levels of priority.
2. Search Smarter
You know how to search through your email archives by typing in an email address address (typing in “to:” and “from:” before the email address) or a keyword (typing in “label:” before the keyword) in the main search bar up top, but you can also exclude certain emails and keywords.
Here’s how: Add a “–” before typing in the rest. For example, if you want to exclude an email address from search, type “-to: [email protected].” And if you want to exclude a keyword from search, type “-label: work.” Search has never been easier.
3. Create “Canned” Responses
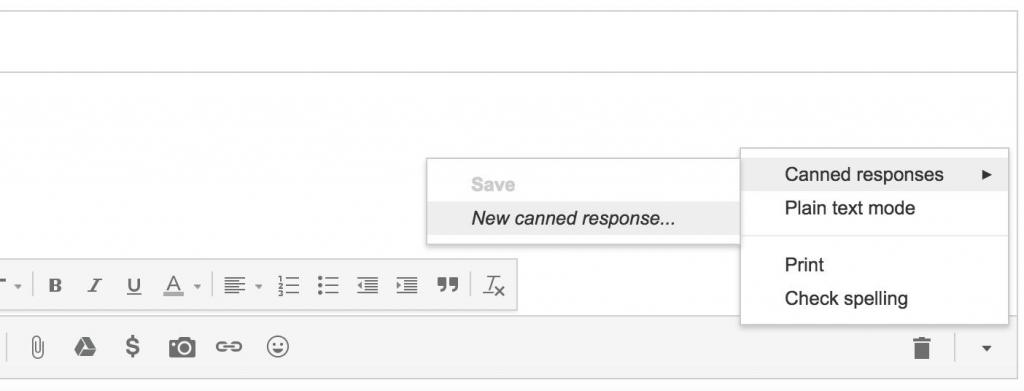
There’s nothing worse than getting a bunch of emails in which you have to type the same reply over and over again. Save that precious time by creating a “canned” or pre-created response that you can throw in an email with one click and be done with it.
Here’s how: Go to settings and then under the Labs section, click “enable canned responses.” Now, go to an email you recently received, click “reply,” then in the response email, click the downward arrow button next to the trash can. You’ll see there is now an option for “Canned responses” and you can create a new response. If you say “Thanks!” a lot, you can add that phrase as a canned response. All it takes is a few clicks to respond to emails now.
4. Save Tasks For Later
If you see an email as you’re about to head into a show or take off in an airplane, you’re not likely to remember it’s there once you’re back online. Got something important and need to save it for later? Add the email to “Save to Tasks” so that you can remember to address it when you’re back on your phone or computer.
Here’s how: Click on any important email, and then in the More tab above the email, you’ll see the option to “Add to tasks.” Clicking will bring you a pop-up version of the email that won’t exit until you’ve checked it off the task list.
5. Color Code Everything
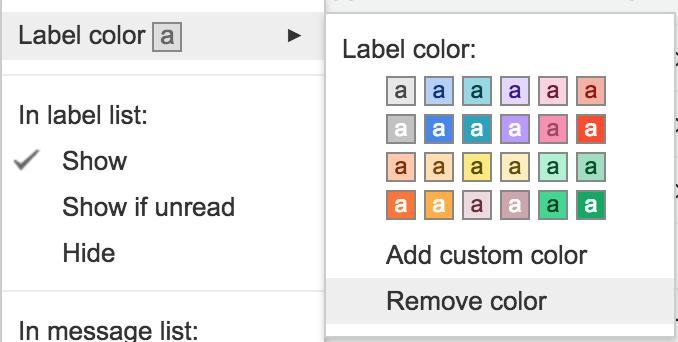

Want to keep track of and categorize your emails in an easy way? If you’re more of a visual thinker, color coding your emails will really help you keep organized. You’ll be able to file specific emails in specific places and you’ll be able to find what you need much quicker than if you had to scroll through pages of emails.
Here’s how: On the lefthand-side navigation bar under Categories, you’ll see the option to “Create new label.” If you want to group all of your newsletters, for example, create a label called “Newsletters.” Then, under your Inbox, you’ll see the label is there. Scroll over the label and click the downward-facing arrow, and you’ll see the option “Label color.” You can choose any color you’d like for the label, and then select the lefthand square box on any email, scroll over the tag icon on the top of the main page and select the label under which you’d like to place the email. From there, you’ll notice that the email is now color and label coded.


